Connect Android Phone to Laptop for Flutter App Development
Learn how to connect your Android phone to your laptop for Flutter development. This guide covers device setup, USB debugging, and APK installation for testing Flutter apps on physical devices.
How can I connect my Android phone to my laptop to run a Flutter app? I’m having trouble with device connectivity and APK installation.
To connect your Android phone to your laptop for Flutter development, first enable USB debugging in Developer Options on your device and connect it via USB. Then use Flutter’s device selector in your IDE (like Android Studio) to detect and run your Flutter app on the physical device. This process ensures your Flutter app can be deployed directly to your Android phone for testing and debugging.
Contents
- Setting Up Your Android Device for Flutter Development
- Connecting Your Android Phone to Your Laptop via USB
- Using Flutter’s Device Selector for App Deployment
- Troubleshooting Device Connectivity Issues
- Installing and Running Flutter APK on Android Devices
- Debugging Your Flutter App on Physical Devices
Setting Up Your Android Device for Flutter Development
Before connecting your Android phone to your laptop, you need to prepare your device for Flutter development. This process involves enabling Developer Options and activating USB debugging, which allows your laptop to recognize and communicate with your Android device.
Start by navigating to your phone’s Settings and finding the “About phone” section. Tap on “Build number” seven times to unlock Developer Options. This might require you to enter your PIN or password for security verification. After successfully enabling Developer Options, return to the main Settings menu and locate the newly available “Developer options” entry.
Within Developer Options, enable “USB debugging” by toggling the switch to the on position. This crucial setting allows your laptop to establish a connection with your device for deploying and debugging Flutter applications. When you connect your device via USB, your phone will display a prompt asking whether to allow USB debugging from your laptop’s computer—make sure to select “Allow” or “Always allow” to establish the connection.
Remember that the exact location of Developer Options may vary slightly depending on your Android version and device manufacturer, but the general path remains consistent across most devices. Once you’ve completed these steps, your Android device is ready to be connected to your laptop for Flutter app development.
Connecting Your Android Phone to Your Laptop via USB
With your Android device properly configured for development, it’s time to establish the physical connection between your phone and laptop. This process is straightforward but requires attention to detail to ensure a successful connection for Flutter development.
Use a high-quality USB cable to connect your Android phone directly to your laptop’s USB port. Avoid using USB hubs or extension cables, as these can sometimes interfere with the connection quality. When you connect the device, your laptop should detect it and automatically attempt to install the necessary drivers if they’re not already present.
On your Android phone, a notification will appear asking whether to allow USB debugging from your laptop. This security measure protects against unauthorized access to your device. Tap “Allow” or “Always allow” to grant the necessary permissions. If you don’t see this prompt, try disconnecting and reconnecting the cable, or check if your phone is set to “Charging” mode rather than “File Transfer” or “MTP” mode.
Once connected, your phone should appear in the system’s device list. You can verify this connection by opening a terminal or command prompt on your laptop and running the adb devices command. If your device is properly recognized, you’ll see its serial number listed with “device” status. This confirmation indicates that your Android phone is ready for Flutter app deployment and debugging.
Using Flutter’s Device Selector for App Deployment
With your Android phone successfully connected to your laptop, it’s time to deploy your Flutter app using the device selector in your IDE. This powerful tool allows you to seamlessly run, debug, and test your Flutter applications on physical devices.
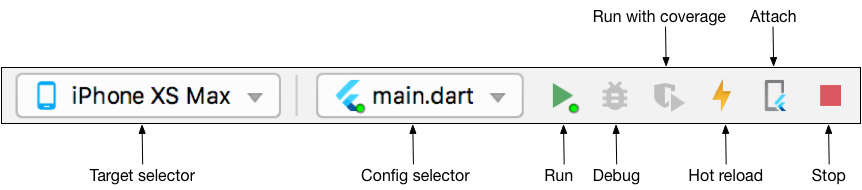
In Android Studio, locate the Flutter Target Selector drop-down button in the main toolbar. This typically appears as a device name followed by a small arrow. When you click this drop-down, it will display a list of all available devices, including your connected Android phone, any running emulators, and previously connected devices. Your Android device should be listed with its model name and serial number.
Select your Android phone from the list to designate it as the deployment target. Once selected, you can launch your Flutter app by clicking the Play icon (the green triangle) in the toolbar or by using the Run menu and selecting “Run ‘app_name’”. Flutter will build the APK for your device and automatically install and launch it on your Android phone.
The device selector also provides additional functionality, such as hot reload capabilities that allow you to see changes in your app in real-time without restarting the application. This iterative development process significantly speeds up the development cycle. When debugging is needed, simply select the Debug icon (the bug-shaped icon) to run your app in debug mode, which enables you to set breakpoints, inspect variables, and step through your code execution on the actual device.
Troubleshooting Device Connectivity Issues
Despite following the proper steps, you might encounter connectivity issues when trying to connect your Android phone to your laptop for Flutter development. These problems can stem from various sources, but most can be resolved with systematic troubleshooting.
If your Android device doesn’t appear in the Flutter Target Selector, the first step is to verify the connection using the Android Debug Bridge (ADB). Open a terminal or command prompt and run adb devices. If your device isn’t listed, the issue lies with the ADB connection rather than Flutter specifically. In this case, try restarting the ADB server with adb kill-server followed by adb start-server, then reconnect your device.
Driver issues are another common cause of connectivity problems. If your laptop can’t recognize your Android device, you may need to install the appropriate USB drivers specific to your phone manufacturer. These drivers are typically available from the manufacturer’s website or through the Android SDK Manager in Android Studio.
Another frequent issue is related to USB mode settings. Ensure your phone is set to “File Transfer” or “MTP” mode rather than “Charging only” mode. You can check and change this setting by dragging down the notification panel when your device is connected and tapping the USB notification to modify the connection type.
Sometimes, conflicts with other USB devices or security software can interfere with the connection. Try disconnecting other USB devices temporarily and temporarily disabling any antivirus or firewall software to see if this resolves the issue. Remember to re-enable your security software after testing.
If you continue to experience problems, consider using the Flutter doctor command in your terminal. This diagnostic tool checks your Flutter installation and dependencies, reporting any issues that might affect device connectivity. Running flutter doctor -v provides detailed output that can help pinpoint specific problems with your development environment.
Installing and Running Flutter APK on Android Devices
Once your Android device is connected and recognized by Flutter, you can proceed with installing and running your Flutter application. This process involves building an APK (Android Package Kit) specifically for your device and deploying it through your development environment.
To build and install your Flutter app on your connected Android device, use the flutter run command in your terminal while your project directory is active. This command automatically detects your connected device, builds the APK, and installs it on your device. By default, Flutter creates a debug build optimized for development, which includes debugging capabilities and is signed with a debug key.
If you need to build a release version of your app for production deployment, use the flutter build apk command. This generates a release APK that can be installed on your device or distributed to users. Unlike debug builds, release builds are optimized for performance and don’t include debugging overhead. You can then install the release APK using adb install build/app/outputs/flutter-apk/app-release.apk.
For more control over the build process, you can specify the target architecture with the --target-platform option. For example, flutter build apk --target-platform android-arm64 builds specifically for 64-bit ARM processors. This is particularly useful when developing for devices with different architecture capabilities.
If you encounter installation errors, such as “INSTALL_FAILED_UPDATE_INCOMPATIBLE,” you may need to uninstall the previous version of your app before installing the new one. Use adb uninstall com.example.yourapp (replacing with your app’s package name) to remove the existing installation.
Remember that Flutter’s hot reload feature works only with debug builds, so if you’re using a release APK, changes to your code won’t be reflected until you rebuild and reinstall the application. This distinction is important during development when you frequently test changes on your device.
Debugging Your Flutter App on Physical Devices
Debugging your Flutter app on a physical Android device provides insights into real-world performance and behavior that emulators can’t fully replicate. Flutter offers robust debugging capabilities that allow you to inspect your app’s state, analyze performance issues, and identify bugs on actual hardware.
To start debugging your Flutter app on your connected Android device, select the Debug icon (the bug-shaped icon) in your IDE instead of the Play icon. This launches your app in debug mode, which enables you to set breakpoints, inspect variables, and step through your code execution. The Flutter debugger in Android Studio provides a comprehensive debugging interface with controls for execution flow, variable inspection, and call stack visualization.
Flutter’s DevTools is a powerful suite of debugging and performance analysis tools that can significantly enhance your debugging experience. To access DevTools, run flutter run with the --profile or --debug flag, then open your Flutter app in the browser using the URL provided in the terminal output. DevTools offers widgets for performance analysis, debugging, memory usage, and more.
When debugging on physical devices, pay special attention to platform-specific issues that might not manifest on emulators. These can include hardware limitations, different screen sizes and densities, unique sensor behaviors, and varying network conditions. Testing on actual hardware helps identify these issues early in the development process.
For real-time debugging without restarting your app, use Flutter’s hot reload feature. While your app is running in debug mode, make changes to your code and press the hot reload button in your IDE. The changes will be applied to your running app almost instantly, allowing you to iterate quickly during debugging sessions.
Remember to monitor your app’s performance on the physical device, as emulators might not accurately represent the performance characteristics of actual hardware. Use Flutter’s performance overlay to identify potential performance bottlenecks and optimize your app accordingly.
Sources
- Flutter Documentation — Running Flutter apps on physical Android devices: https://docs.flutter.dev/development/tools/android-studio
- Flutter Development Team — Connecting Android devices for Flutter app deployment: https://flutter.dev/docs/development/tools/android-studio
- Android Developer — Official guide to USB debugging and device connection: https://developer.android.com/studio/run/device
- Flutter Documentation — Flutter doctor for diagnosing connection issues: https://docs.flutter.dev/tools/flutter-doctor
- Android Developer — Managing device connections and USB drivers: https://developer.android.com/studio/run/oem-usb
Conclusion
Successfully connecting your Android phone to your laptop for Flutter development requires proper device setup, USB debugging configuration, and understanding Flutter’s deployment tools. By following the steps outlined in this guide, you can establish a reliable connection between your device and development environment, enabling seamless app deployment and debugging. Remember to troubleshoot connectivity issues systematically and leverage Flutter’s powerful debugging tools to identify and resolve problems efficiently. With your Android phone properly connected, you can take full advantage of Flutter’s cross-platform development capabilities to build and test applications directly on physical hardware.
To run a Flutter app on an Android phone, connect the device to your laptop and open the Flutter project in the IDE. When you connect devices, or start simulators, additional entries appear in the Flutter Target Selector drop‑down button in the IDE toolbar. Select the device from the list and click the Play icon (Run) or Debug icon to launch the app. The IDE will build the app and launch it on the selected device. If the device does not appear, ensure the Android SDK and Flutter plugin are up to date and that the device is recognized by the system.
When you connect an Android device via USB, it appears in the Flutter Target Selector drop-down on the main toolbar. Click the Play icon or Run > Run to launch the app on the device. For debugging, set breakpoints and click the Debug icon or use Run > Debug. The toolbar also shows the target selector, which lists all connected devices and emulators.